The 10 Steps I Take to Professionally Sharpen Your Blades
1) Inspection
I inspect the blades thoroughly for damage, and wear and tear. If a blade is too worn out or damaged to be sharpened, I will notify you that it will need to be replaced instead of sharpened.
You can choose to have your broken or worn out blades either returned to you unsharpened, or left with me for recycling. They are not trashed. Any parts in good condition are kept to use for free replacement parts.
2) Repairs
FREE Repairs: For all A-5 animal clipper blades, I replace any damaged or worn springs, sockets, guides, and any missing screws at no charge. For Wahl 5-in-1 adjustable animal clipper blades (not the Arco mini), I will replace any broken plastic parts involving the plastic platform, along with replacing the steel cutter blade.
Due to the risk of injury to the animals, I do not sharpen blades with broken or bent teeth. In addition, I do not sharpen generic off-brand blades, as the cheap metal does not sharpen well.
3) Thorough Cleaning
I brush blades clean of any coarse debris, and then place them in an ultrasonic cleaner with a degreasing solution to remove any residual blade oil, body oils, dander, feces, blood, tiny bits of hair, and other organic matter. They are then rinsed and dried.
4) Professionally Sharpen
I use a professional automatic sharpening machine that allows me to make multiple adjustments in order to properly sharpen a wide variety and sizes of clipper blades. It also magnetically holds the blades in the exact position needed for precise sharpening.
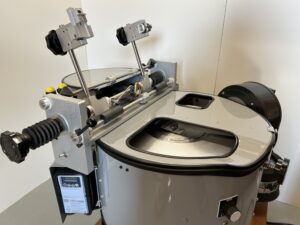
Most sharpeners hold the blades by hand during the sharpening process. This often produces inconsistent quality of sharpening, as the pressure from the hand holding the blades on the sharpening disk often subtly shifts during the process.
Clipper blades require extremely accurate work. Differences of less than 1,000th of an inch can cause a blade to cut poorly, and leave you struggling.
I want your blades to have as long a potential life span as possible, so one of my goals is to remove only as much metal as is necessary to create new clean sharp edges. This machine allows me to precisely remove the least amount of metal needed to properly sharpen your blades.
5) Confirm Sharpening Quality
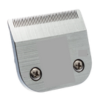
The first step after sharpening the blades is to inspect the teeth under a magnifying glass to confirm that they now have clean sharp edges. If not, the blades are sharpened more until they do. Then I rub the blades on a perfectly flat steel block. This allows me to visually confirm that every single tooth on A5 blades has the proper hollow grind.
6) Demagnetize the blades
The next step is to demagnetize the blades. Why demagnetize? During both regular use and during sharpening, the steel blades will often naturally become magnetic. This can increase the friction and heat between the blades during use, and it will also make it almost impossible to thoroughly remove all of the tiny steel particles that are created when the blades are honed sharp. If these particles are not completely removed, they can dull the freshly sharpened blades very quickly during use.
7) Remove Burrs and Clean
Another necessary step is to physically remove any metal burrs that were created during the sharpening process, and to thoroughly clean the blades of any remaining particles.
8) Adjust and Replace Parts as Needed
- Check that sockets are level and in good condition, and their ears are straight and can sit squarely and firmly against clipper hinges. Adjust or replace as needed (FREE).
- Check that springs are not twisted, and that both sides of the spring has the correct tension. Adjust or replace as needed (FREE).
- Check that the nylon guides on the springs are in good condition. Replace as needed (FREE).
- Check the outside corners and tips of the comb blades (especially surgical blades), and soften any areas that are too sharp and could potentially scratch the skin. The tips and corners of comb blades should feel soft, like a ballpoint pen, when used in any direction.
9) Put Blades Back Together
When putting A5 blades back together, I make sure the teeth of the two blades are precisely parallel to each other. Also, using a specially machined gauge, I create the proper setback distance between the teeth of the two blades (.020” for surgical blades, .035” for remaining blades). If the cutter is too far forward, it can slice through the skin. Too far back, and the blade won’t cut properly.
For Wahl 5-in-1 adjustable detachable blades, after I sharpen the comb blade, I replace the cutter blade, and inspect the plastic platform for any damage and replace any broken plastic parts (FREE).
10) Test the Blades
After the blades are put back together, oiled, and set to the proper tension, I have two different tests that I use to make sure the blades are cutting well.
- I use a special multi-strand string to test how cleanly it gets cut at various places along the blade – especially at each corner. This method is often used at manufacturer facilities.
- I can also test the blades on very dense fine faux fur, to make sure that they cut cleanly and smoothly when moving through the fur at a normal speed.
After blowing off any fiber used in testing, the blade sets are placed in plastic bags, and safely packed in a sturdy shipping box specially designed for clipper blades.